Monday, December 4, 2023

Lucky Number Seven - with Hero Arts Digitals

 Hi Friends,

Welcome to the December My Monthly Hero (MMH) blog hop!  There's so much inspiration for you--I hope you're hopping all the way through.

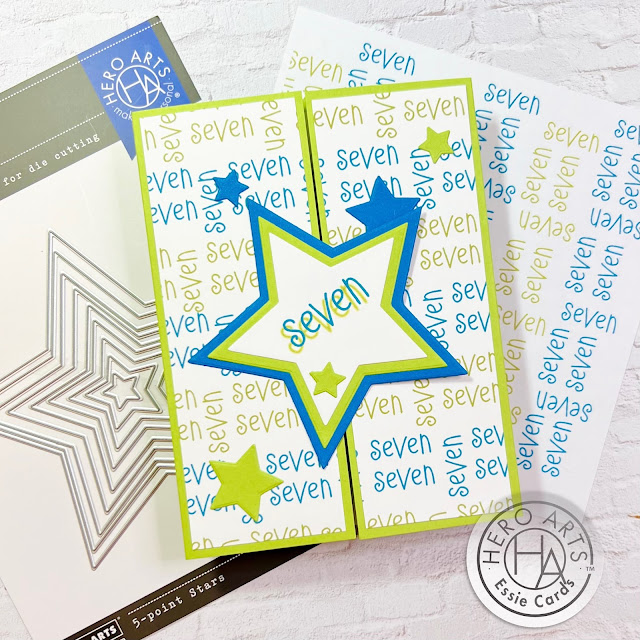
My crafty friend Deborah is the kind of grandmother I hope I'll be someday--active, fun, crafty, and completely devoted to her grandson, who is about to be seven.  Today's card is inspired by her  grandson, who turns seven next month.  

Hero Arts has three fun and affordable digital kits to kick off the New Year--and this Whimsical Numbers Digital Kit, has numbers in a very cute script, that looked perfect for the occasion!

How To:  

1. This is a simple gatefold card, using a bright green cardstock base that is 5.5 X 8.25 inches, scored and folded on both sides, 2.25 from each end.  I've added a white panel to the inside, and it is the usual 4 X 5.25 inches.  

2. Setting aside the card base, I used the word seven image from the Whimsical Numbers kit to make a quick background by copying that "seven" word multiple times into a blank Google slide, and moving the images around to create a strip of sevens that marched in a line, two horizontal sevens intersected with a vertical seven.  I repeated it several times to ensure that the strip was longer than 4 inches --so it would be long enough to cover the A2 background I wanted.  I grouped this strip of sevens, and copied the grouping several times, arranging them one below the other on the slide.

3. In Google slides under tools recolor, I found both a bright green and teal recolor option, so I chose those two colors, creating a green and teal color scheme.  

4. After printing the slide onto lightweight cardstock (but you could also use plain old copy paper for this technique,) I cut two panels that fit just inside the "gates" of the gatefold:  2 X 5.25 inches--and mounted them on the gates.  

5.  I also took the word seven, blew it up, and did a shadow technique on a separate google slide, again using teal and bright green recoloring.  After printing this out, I die cut the shadowed word on the smallest of three larger stars from Hero Arts 5-Point Stars Infinity die set.   Using the green card base color and a teal that matched the background, I die cut two progressively bigger stars, and a few smaller stars in both colors.  

6.  The rest is kind of obvious:  Mount the 3 big stars on top of each other, and then glue down the left half (ONLY!) of the star onto the left "gate."  Add the random smaller stars in a way that pleases your eye and that's it.  Minimal supplies for a maximally happy birthday card for a very well-loved young man!

I'd love to see your results with this month's new Hero products--digital and physical--there's so much new fun on its way!

Here's the full blog hop list so that you can see everyone else's creations:


Hero Arts

As always, thanks so much for stopping by!

Essie


Sunday, November 5, 2023

Digital Merriment with Hero Arts

 Hello friends!

    This month Hero Arts has FOUR (yes, 4!!) new digital kits/printables to release with the November My Monthly Hero card kit and add ons--and I've kind of just "gone to town" with these and have made some gift tags, a card that features the too cute digital papers, and a whole lot of foiling with the printable owls and some backgrounds I created with the kits and foiled myself.  Instead of a lot of instruction, let me just "show the goods."  

    First up, using the adorable Christmas Icons Digital Papers and the teddy bear from the Vintage Toys Fancy Dies, I made this simple, graphic card.  

Next up:  Gift tags!  Here, I used the Festive borders and the Frosty Borders kits and made some eassy designs and holiday greetings.  I used the colors Hero provided (often I recolor them using the Google slide app) and printed them onto plain old copy paper.  I glued the paper to holiday colored card stock to  create quick little gift tags, which are always in short supply at my house this time of year!

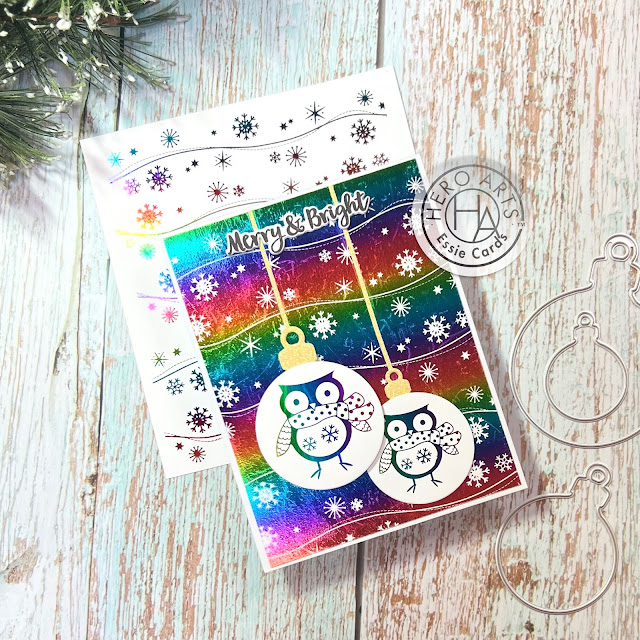
    And finally:  Foiling!  I used the kits again to make two different snowy backgrounds and printed them on my laser printer in black (toner) ink.  You know that this lets me foil these designs with my Minc machine (or you can use a laminator) using toner reactive foil.  I made a couple of handfuls of designs using those snowy backgrounds and also foiling the Owl Tag Printables--so now I have a ton of sparkly owls and tags that will be perfect for holiday packages.  I used the negative foil piece from one of my snowy backgrounds and two little owls to put together a super quick --and super shiny!-- rainbow Christmas cards with two rainbow-foiled owls taking center stage as holiday ornaments.  My daughter says it's "too wild" for her. . . which is fine, I have plenty of wild & crafty friends who I think will love this one.  

    And that's it--plenty of fun with these four new digital products from Hero Arts--I'd love to see what you make with them!

Thanks for stopping by!

Essie

Tuesday, October 17, 2023

Penguin Pals from Gina K. and Thermoweb

 Hello friends,

I was so thrilled to win an early copy of the new Gina K./Thermoweb collaboration - The Penguin Pal Card Kit, and a huge bundle of Gina K. and Thermoweb foils. flock, glitter gel, and huge assortment of adhesives!  Thanks so much Thermoweb and Gina K!  If you follow me on IG or here on my blog, you might know that I am a foiling junkie!  (and you know I have my name on the list for Gina's new Fuse Foiling System.  

My box of goodies showed up yesterday afternoon, just in time for me to make a card and two tags using all the foil-y, flock-y goodness I could, some of the kit's stamps, the sweet penguin die, and the cool snowflake and starburst die.  Here's my card: 

And then, even though it was way past my bedtime, I made a couple of quick tags--because I really wanted to try out the light pink and blue flocking (see that pink penguin!) and the kit stencil, which I paired with the gold glitter glitz gel I received and the Christmas tree die.
And in case you're curious:  Two photos that show everything that came as my prize with the Penguin kit: 
These foils and Glitz gels are soooooo sparkly!  And LOOK at all these adhesives, and flock and the toner card fronts (which I totally hoard!)

So, Christmas has really come early for me!  Thanks again, Thermoweb and Gina K.--you've kicked my holiday making into sparkling high gear!

Thanks for stopping by,
Essie


Monday, October 2, 2023

Winter Homes - Digital pop up card with Hero Arts

 Hi friends,  

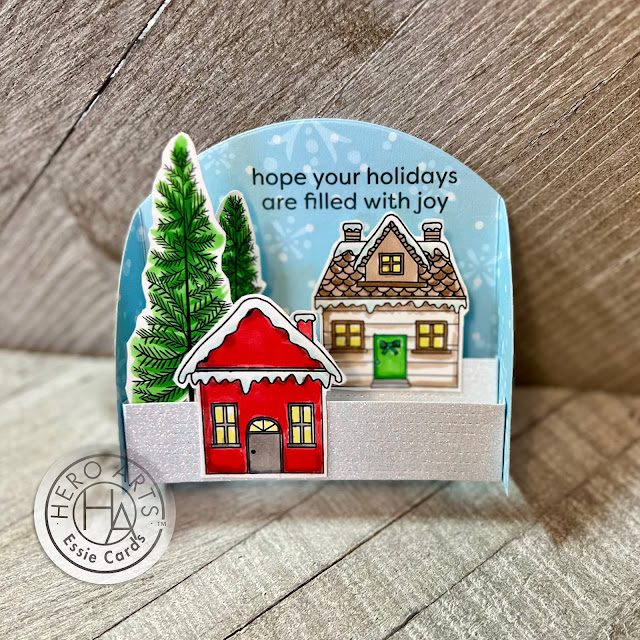
There are so many new digital images this month at Hero Arts, it was hard to decide what to focus on.  I've used the sweet houses as the focal point for today's card. 


The base of this semicircle pop-up card uses the Snowflake Digital Papers in light blue--a perfect scene setter for this homes and pine trees in the Winter Homes Printable.  I printed that page on lightweight cardstock and colored the homes and trees with Copic marker in a graphic cartoon-y style.  Very simple. 

Using Hero Arts white glitter cardstock, I cut two 4 3/4 strips, with 1/4 folds on each end.  I used extra strong adhesive on those folds and slotted them into the  1 1/4 inch "wings" of that 6 1/2 inch semi-circle. Those glittery strips make snowy hills on which I adhered the two homes and pine trees.  Again--the key here is using extra strong adhesive--to me, that's the key to success when working with glitter cardstock.

For a sentiment, I've used a rub-on transfer from the new Holiday Messages set.  I think the no-frills font really works well with this little scene.

And that's the card!  

I hope you'll give these digital images a try -- and I'd love to see what you make!

Thanks for dropping by!

Essie

Monday, September 4, 2023

Mushroom Hunting with Hero Arts

Hello Crafty Friends,

How about some fantasy mushroom hunting using the latest printable from Hero Arts -- are they not adorable?  Kind of Autumnal Alice in Wonderland goes wild, I think?

I drank my morning coffee while watching the AMAZING Kelly Taylor do some bokeh/Copic backgrounds--her video was so inspiring that I had to try it myself! 

I spent today recovering from jet lag and coloring the grouped mushrooms in this digital printable (while binge-watching Better Call Saul...how have I missed this show?).  My back ground did NOT come out smooth and dreamy (sigh...it is not like Kelly's...), but the streaky colors still made me smile and I carried on coloring my little mushroom patch.  

Following Kelly's lead, I used Hero Arts unicorn white pigment ink with the Large Sprinkled Dots stencil to add that bokeh effect (Kelly does that a little differently, but I think this stencil really gets the job done).  I added a sentiment from the printable that's appropriately punny, backed both the mushrooms and the sentiment in HA's woodland cardstock, mounted them on an A2 card base and BOOM!  presto-card-o, ready to mail.  

I'll have more digital-based cards later this month for you (there's also a tree printable and a leafy digital kit to play with).  Until then, enjoy the changing season and thanks for stopping by. 

Essie

Sunday, August 6, 2023

New Adventures with Hero Arts Digitals

 Hello Crafty Friends!  

My son's return to college is on my mind (we'll be road-tripping to Ohio soon in my minivan to help him move into his very first apartment), so I've made a couple of cards that nod to his future in a positive way. 

These cards are two-fer, because they use a single design and a single sheet of foil to create two different card fronts--one using the positive design, and the other using the "waste material" or negative space  that the design left behind on my piece of toner foil.  

Note:  To foil digital designs you need:  a laser printer, a laminator or Minc machine, toner foil, and, for the black background card, either specialty toner paper, or very glossy black card stock.  

Here's my how-to for the design and the white background card:  Using the minivan image I discovered among the over 20 images in the Roadtrip Adventure Digital Kit, I created a line of minivans and copied that line o' vans again and again, until it covered a space about the size of an A2 card front on a Google slide in a design that was pleasing to my eye.  

Another note:  I've never taken a design class, and never had a lesson in Google docs/slides or anything else, this is just me playing around until I have something that looks right.  Google slide software is free, which is what I love most about it. 

I printed that slide/page on my Laser Jet printer onto lightweight card stock (yes, the cheap stuff I do NOT use for card bases), added summer-y rainbow toner foil, and ran it through my Minc machine/laminator.  After cutting the Google page to an A2 size, I cut a star shape  from the upper right corner of the foiled background using the 5-point infinity star dies and cut another star, one size larger, from Hero Arts pitch black card stock.  I also cut out 5 of the smallest-sized star from the pitch black card stock.  Using foam tape, I added the black star over the star cut out, and then adhered the smaller star cutout on top of the black star, making sure to align the smaller star's minivans with the background.  I like this semi-eclipse design--it's slightly subtle, but adds texture and interest.  I adhered the panel to an A2 card base, again made from pitch black card stock, scattered around the 5 smaller stars and added a sentiment I like from the Encouragement Sentiment Strip set which I'd pre-cut using the Sentiment Strip Fancy Die -- I love having these sentiments ready to go. 


To make the second card--the one with a black background, I used the leftover/negative space toner foil.  I've found that shiny black card stock, or specialty black toner card stock take toner foil perfectly.  


I just placed the minivan "leftover" foil piece over an A2 piece of glossy black card stock.  I made a quick video of the reveal as I remove the foil backer from the card, just click the arrow below. 

 
For the sentiment tag, I used the Travel Tag & Notes Printable--I printed the tags in black onto black card stock, cut out the tag I wanted (you can see the ink on the card stock--if you're looking for it!--and ran it through my Minc machine/laminator with gold toner foil.   Eureka!  The tag came to life in gold on black.  I gold heat-embossed a sentiment from the Seaside Highway HeroScape onto the tag and added a gold bow to complete the tag.  I mounted the panel onto a white A2 card base, and used foam tape to pop up the black tag.  

(Final Note:  Hubby says both cards are  "somber."  I say they are modern and urban cool and good masculine cards for my son.  We have agreed to disagree.)

Thanks so much for stopping by--I love that you took the time to drop in (and your comments always make my day!

Essie


Wednesday, July 5, 2023

Flower Arranging with Hero Arts Digitals

 Hello friends!

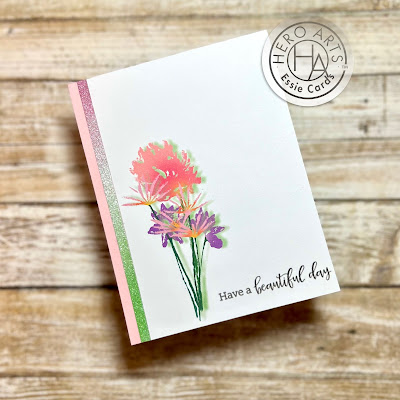
I had such fun working with the July digital kit from Hero Arts called "Real Flowers."  They are really gorgeous and ready for arranging.  Using (as ever) free software from Google, I made a set of 4 different cards, and added a surprise inside each one. 


There are 16 (yes, 16!) different flowers in the digital kit.  Each is presented in a bright color and also in black.  

For each card, I simply arranged flowers into a small bouquet--3 different flowers, sending the taller ones to the back of the arrangement, the smaller ones in the front, and tilting the flowers so that the stems overlap near the bottom.  I turned each arrangement into a grouping and added a green drop shadow to the arrangement --the shadow adds so much dimension. I placed this image into the left lower corner of the page.

Using sentiments from the new Park Scene Printable, I added a sentiment to the bottom right of each bouquet.  

I used Hero Arts peony card stock for card bases and, to create sparkle and a little something extra, I blended a piece of Hero Arts silver glitter card stock with pinks on the top and dark green on the bottom, creating a sort of ombre using Hero's inks in pine, azalea, cotton candy, and peony.   I cut this glitzy ombre paper into  1/4 inch strips and placed a strip on the left side of each card--again weighting the design to the left.  


And so that's the card set--clean and simple--for me!

Well, that's almost it. The flowers were so easy to work with that I created an interior panel for each card using a single bloom from the card's bouquet, sized large, and with a lot of transparency (I moved the "opacity" to about 25% for those interior blooms.)  It was such a quick and easy addition, and sweetly completes the cards.  To show you these special interiors, I added a teeny tiny video to my teeny tiny YouTube channel--here's the link:  Essie's Flower Cards on YT 

Thanks so much for stopping by--I'm excited to see what you create with these latest Hero Arts digital designs.

Essie 


Monday, June 5, 2023

Totally "shellfish" weekend with Hero Arts Digitals

 Hello Crafty Friends,

Hero Arts Printables always make me happy -- and this month there is lots to smile about:  Great sentiments, and sweet ocean images that were perfect to remind myself that I still love Copic coloring.  After making a couple of cards using the Printables for June early last week, I thought I was done with digitals for a while.  I do love the two cards I made using the dolphins and sea turtle images:


But late Friday night, I popped open the new digital kit called "She Sells Seashells," and decided I wasn't done after all--and the seashell images were so cool that I had to use them all!   So I pulled each image into a single google slide, positioned them in a pattern that was pleasing to me, changed the colorway to a "delft blue" image (I'm stuck on blue...always!). I also made a second colorway using more of a pool blue color.  I printed them onto lightweight cardstock, die cut some shells using my Seashells Fancy Dies, some "hello there" sentiments using the Hello There Stamp & Cut, and, for the pool blue card, I also die cut the Swirling Tide Border Fancy Die with Frame and ink blended  that border in pool shades.  With all those bits & pieces in hand I quickly put together my two seaside greeting cards--ready to send to my friends and kick my summer crafting into high gear.  

I'd love to see what you're making this summer!  If you have a blog or IG page, just pop it into the comments below -- I'd love to drop by and see what you're up to!

Thanks for visiting!

Essie


Monday, May 1, 2023

Summer Fun with Hero Arts Digitals

Hello Crafty Friends!

Much to my surprise and delight, summer is just around the corner.  Happily, Hero Arts new digital kit is  is just the thing to help me turn to summer card making.  

Here's my first Hero Arts Digital card this month: 


How to:  Using the Summer Memories Digital Kit, I copied the Summer Memories background image into a google doc and recolored it green in the google app and printed it onto onto copy paper.  I used a sticky adhesive sheet to paste the copy paper to a piece of light cardstock, cut it to 5.25 X 4 and lightly (sooo lightly!) blended some light blue ink in a cloudy kind of way everywhere except the bottom inch.  For the bottom inch I saved for some green ink blending.  Over the top I added the flamingo from the Lawn Ornaments Fancy Die set and its grass tufts so the flamingo has something to stand on.  These die cuts are just ink blended with ink that was left on my blenders.  I colored the flamingo's eye and beak with my black copic and then covered those with my Hero Arts Crystal Clear Lacquer Pen--because every card needs a tiny bit of shine, right?! Took my flaminigo'd, summery panel and popped into my A2 card base and that's it!

Digital images are so easy and quick to use--and they are a great way to showcase diecuts and other bigger parts of your crafty wardrobe!

Thanks so much for stopping by,

Essie

Monday, April 3, 2023

Hero Arts - Digital Petals Pop Art

Hello Friends,

Today is release day for the April My Monthly Hero Kit, which is choc full of slightly mod flower and some fab textures -- while waiting for my kit to arrive,  I played with images and sentiments from two of the digital sets, which release today.   Can you tell which artist I'm channeling? 

Card How To: 

  1. I opened a google doc, copied my favorite bloom from the Patterned Petals Digital Kit, and dropped it four times onto the blank page in the square formation (the blooms line up pretty automatically.  
  2. Printed it on very lightweight cardstock and colored the bloom in Copics--3 colors per flower (R32, R24, R26; Y00, Y06 Y17; B000, B02, B04; YG01, YG03, G14.) I did a drop shadow around the blooms using N0, N1, and N3. 
  3. Cut the design with my Square Infinity dies, and framed it with Hero Arts Pitch Black cardstock (best black cardstock evah.). 
  4. On the card base, I used a light gray ink and the Abstract Frames stencil to give my "wall" a little texture and mounted this picture using 3 squares of heavy cardstock to pop up the picture and a little ink line and a silver dot from my stash as my picture hanger.  
  5. The sentiment (also matted in black and popped up with 3 additional layers of cardstock) is from the Flowers in Vases Printable--which has such cute images and great sentiments--and I love the happy look of this font.  

I'm trying to channel Andy Warhol here with the same image in four colors--I find the symmetry and bright color pretty pleasing to my tired eyes.  What do you think?

Thanks for stopping by,

Essie

Meaningful Wishes (but no Meerkat)

     I love that the Meaningful Meerkat stamp  from The Rabbit Hole Designs set has a "no meerkat" image and a useful, non-meerkat, get well sentiment.  I find that I do often need a get well card and try to always have one or two in my stash.  Well, the Meaningful Meerkat offered just that, courtesy of the bucket full of daffodils and the Get Well Wishes sentiment that are part of this 4X6 set.  


    My coloring technique for this card is no-line coloring using my colored pencils (I generally use Prismacolors).  No-line coloring is something I rarely do, but this bouquet is so lovely that I decided to give it a try so that these precious flowers wouldn't fight the black line of my usual stamping method.  I like how it turned out, and it was good to strrrrretch my crafty brain.  I even stamped the sentiment in navy ink, instead of black--again, my thinking was to not overwhelm the colored bouquet.  

    I diecut the main panel using the You've Been Framed die set backed with yellow card stock to peek out behind the diecut dots.  And speaking of dots, I decided that the white panel was a little too CAS for me, and so I added five enamel dots.  These are actually the Matte White Enamel Dots, but I used my Copic markers to mimic the colors in my daffodils.  (Gotta love that I can turn these white dots into any color!

    Finally, for extra fun, I used some blue patterned paper from my stash, as my background on the A2 card, and offset the main panel instead of just centering it.  I like the added interest created by that unexpected angle.

    And that's the card--I hope you enjoyed it!

    Thanks for stopping by!

    Essie  

Tuesday, March 28, 2023

Another Meerkat Mobster

 Hello Crafty friends,

Let's get another look at the I Really Dig You meerkat set from The Rabbit Hole Designs.  I've used the overall-covered meerkat farmer again, this time colored with Zig clean color markers, and this time I used masking paper in order to place the meerkat in front of a nice long picket fence and a cloudy blue sky.  The cloudy sky is stenciled using the new Torn Paper stencil.  A simple card, but with that meerkat, unexpectedly sweet.  


Now, you still have time for our fabulous giveaway!  Here's what you need to know--

To celebrate the April 2023 release, The Rabbit Hole Designs is giving away two savings vouchers; one to a lucky Instagram follower and one to a lucky Facebook Fan Page follower. The winner will be chosen at random from the comments left on the Instagram post, and tagging friends, and also from commenting on the Fan Page post. So make sure to head on over to Instagram and the Fanpage, look for the giveaway post. Must comment by 11:59 pm PST 3-30-2023

@therabbitholedesignsllc

and look for the post at

The Rabbit Hole Designs Fan Page

Winners will be contacted via DM for the Instagram winner and announced in the Facebook Fan Page for the Fan Page follower winner on 3-31-2023


Thanks for stopping by!

Essie

More of that Mob of Meerkats

Hello Crafty Friends!

I love to google the names of groups of animals--like "a kaleidoscope of butterflies," "a waddle of penguins, and so one.  And so, with the arrival of the meerkat stamps from The Rabbit Hole Designs, I got to look up the name for a group of meerkats and it is...yes!  A mob of meerkats!  I love it!


Today's little meerkat and sentiments come from  the Meaningful Meerkat set, illustrated by Agotapop, whose charming critters and fanciful florals made this card a breeze to color and put together.  I opted for a graphic design to contrast with the playfulness of this meerkat and flowers.  Copic colored images, because that is a bit of a go-to for me.  I made corners of the sentiments for my main panel and then expanded the panel's width with a couple of strips of colored cardstock to highlight the blue daisies....and that was the that.  A friendly little meerkat, dropping by with some springtime cheer.

Don't forget our new release hop and Giveaway--hope you'll play along!   Home base is: The Rabbit Hole Designs  

GIVEAWAYS:

To celebrate the April 2023 release, The Rabbit Hole Designs is giving away two savings vouchers; one to a lucky Instagram follower and one to a lucky Facebook Fan Page follower. The winner will be chosen at random from the comments left on the Instagram post, and tagging friends, and also from commenting on the Fan Page post. So make sure to head on over to Instagram and the Fanpage, look for the giveaway post. Must comment by 11:59 pm PST 3-30-2023

@therabbitholedesignsllc

and look for the post at

The Rabbit Hole Designs Fan Page

Winners will be contacted via DM for the Instagram winner and announced in the Facebook Fan Page for the Fan Page follower winner on 3-31-2023

Thanks for stopping by!

Essie


Monday, March 27, 2023

I really Dig You #1

 Hello Crafty Cardmaking Friends,

Who knew that meerkats were so stinking cute?  Me...I had no idea!  And wow, this new release from The Rabbit Hole Designs is full of great images and tools! 

Today's card uses the brand new I Really Dig You set and the so cool (and durable and perfectly sized and precut and taped for A2 cards) Shaker Acetate Sheets.  

The gardening tools in this stamp set really grabbed me--probably because I have spring fever and love to dig in the dirt--so I popped them onto an acrylic block, held my breath, and stamped them in rows until my background was filled.  I colored them and the meerkat with my Copics.  Used a Shaker Sheet (with its own perfect tape to stick them easily to your card base) to turn the background into a shaker, and that's about all that needs a little explaining.  


I love the cherry red, blue denim, and sap green colors--do you?  Feels like it's time to go to the Garden Center!  Hope you enjoyed this card--this little meerkat will be back later this week!

Of course we have a hop and a Giveaway--hope you'll play along!   Home base is: The Rabbit Hole Designs  

GIVEAWAYS:

To celebrate the April 2023 release, The Rabbit Hole Designs is giving away two savings vouchers; one to a lucky Instagram follower and one to a lucky Facebook Fan Page follower. The winner will be chosen at random from the comments left on the Instagram post, and tagging friends, and also from commenting on the Fan Page post. So make sure to head on over to Instagram and the Fanpage, look for the giveaway post. Must comment by 11:59 pm PST 3-30-2023

@therabbitholedesignsllc

and look for the post at

The Rabbit Hole Designs Fan Page

Winners will be contacted via DM for the Instagram winner and announced in the Facebook Fan Page for the Fan Page follower winner on 3-31-2023

Thanks for stopping by!

Essie

Monday, February 6, 2023

Celebrating Butterflies with Hero Arts

 There's something so magical about butterflies, don't you agree?  That whispering lightness, those colors, the fragility in flight, all seems too perfect, and too slight to be real.   And yet...they are quite real.  

I'm delighted to help the Hero Arts design team kick off a magical, butterfly-filled release by highlighting just one of the beautiful digital images available today at Hero Arts.  

The Papillions Digital Kit  has 16 images to play with of beautiful detailed butterflies that will make you think you are a botanical artist lost in paradise.  There are also two other butterfly printables:  Butterflies and Butterfly Gardens - both are so whimsical and sweet AND each has a handful of sentiments that match the images perfectly...I'll be creating with them, too and have added them to my digital collection.  

But these butterflies, with their "come see my antique etchings" vibe...I knew immediately how I wanted to use them!


Here's my how-to: 
1.  I opened a blank slide in my google drive and added the black and white version of ornithopter--which has these three butterflies as a single image.  I blew it up slightly so that the edges of the images would "fall off" and A2 card front, and printed the slide with my laser jet printer on lightweight cardstock.  I colored the blutterflies using my Copic markers in shades of light blue, blue green, and yellow and then added dots in the same colors to create a background, as well as a subtle shadow, heaviest on the left side, to make those butterflies seem to hover about the card and add a bit of dimension.  

2. With my coloring complete (although with Copics, I'm never really sure if I'm done), I cut the slide down to 4X5.25 inches using my Nesting Rectangles Infinity Dies

3.  I ran the card front through my Minc toner foiling machine (you can use a laminator, instead), using an iridescent light teal blue piece of toner foil from my stash--soooo pretty!!  The iridescence really catches the light.  

4.  I pulled a piece of light teal foil cardstock from my stash and die cut it with the largest (A2 sized -  4.25X5.5 inches) of the Nesting Rectangles Infinity Dies.  This is the mat for my image. 

5.  I die cut "celebrate" from the Celebrate Words Fancy Dies, once in white card stock and once in yellow, using my Hero Arts Compact Cutter, which is just perfect for these smaller cutting jobs.  I really like these sentiments--they're the perfect size to get my point across, but don't detract from this full card front image. 

6.  And that's almost the end--I just glued/taped everything onto a white card base working, as always, from the bottom layer (foil mat) to the main image, to the sentiment on top--the slightly offset yellow celebrate is slightly below and left of the white one--mirroring the shadowing angle of the butterflies.

Fast, fun, and easily repeatable with this image or the other butterflies.  And while I love the foiling (have you noticed that it's a favorite technique?), this image would be equally stunning in the pre-colored images in the Papillions kit, or just printed in black and white (or maybe gray and white!) and colored in whatever medium suits your fancy.

And there's a giveaway!!  I hope you'll hop along with the rest of the Hero Arts designers and guests and do leave comments since Hero Arts will give away a $50 gift card, drawn from the comments left across the hop. Enter by Sunday, February 12th at 11:59pm Pacific, and the winner will be announced on the Hero Arts blog the following week.

One last look: 


Thanks so much for joining me!

Essie


Sunday, January 29, 2023

Big Hugs

     As we enter into the almost-Valentines/Galentines Days flurry of crafty activity, I've unearthed my Valentines cardmaking supplies...but this year some of my cards for the holiday of love, like, and friendship are NOT Red, pink, and full of hearts and flowers (don't get me wrong, I do those, too!).  I find myself moving toward friendship cards--like this one, featuring that sweet new puffin set from A Rabbit Hole Designs:  


I like that I can send this as a Valentines greeting for a friend, but that I can use it any other time of year, too.  

So--about the card:  This little puffin is so sweet and unexpected and has enough colors in his beak and balloons to tie in all the colors in my rainbow-hued scripty hugs stamp. 

And can we talk about that rainbow of hugs for a minute?  I'm not the best stamper, but my MISTI stamping took really took this project "to the bank." I used my new Catherine Pooler inks (y'all, they really are as good as everyone says!) and triple-stamped each hug to get completely solid images.  I can't believe how perfectly stamped each image is!  And this is particularly important, since I'd already stamped and colored the puffin using my Zig water color makers. Any mistakes would meant a major re-design of this single panel card.  Not the end of the world, and I make a ton of boo-boos while crafting, but I really wanted this design to turn out right.  

My question for the day:  Do you make cards with a pre-determined design in your head or on paper, or are a seat-of-the-pants (SOTP) maker?  I'm a SOTP maker, almost always--including this one, which started with the colored-in puffin, then had me sitting and starting at him for a while, and then the ah-ha! moment of big hugs and more hugs.  That's often how my "process" works:  I create a focal point/main image, and then stare at it, waiting for inspiration to club me over the head. This time, the clubbing came quickly and no re-work was required.  Winner!

Hope you enjoyed it!

Thanks for stopping by,

Essie

Friday, January 20, 2023

Crafty Traveling and Happy 4th Birthday to the Rabbit Hole Designs

Hello Friends!

I'm continuing to enjoy the new release from The Rabbit Hole Designs (TRHD), and used my holiday cruise coloring time to create this simple, sweet birthday card. 


            How to:  I used masking and the triple balloon image and large gift box from the Year Four Birthday stamp set as a combo to create a big rainbow balloon bouquet that seems to be air-dropping this gift onto a pretty green hillside.  After coloring this "ballon bomb" of love with my colored pencils, I (re-)affixed the masks over the balloon and gift box and gently blended the sky and hills below.  Peeled off the masks and voila! -- A one layer image that will zip through the mail and provide a lot of color and cheer for the recipient.  


This picture is an in-progress shot of today's card--taken on the veranda of our stateroom on a glorious Caribbean cruise our family enjoyed over the holidays.  I find it SO relaxing to color on vacation!  Here is the gear I bring along: 

1. A plastic zip top pouch full of pre-stamped images and even some coloring pages.

2. Dollar Store plastic box packed with my well-loved Prismascolors.  I wad up a piece or two of paper towel in the top when traveling to protect the points.  This box lives in my carry on luggage in case of "found time" in airports. 

3. A Mono Sand eraser because I'm not as neat as I wish I was.

4. A good sharp metal pencil sharpener.  Not fancy, at all, (less than $5) and I sharpen my pencils straight into that little baggy on the table.  What everyone says is totally true:  A sharp point is critical for successful pencil work!

5. A good pair of craft scissors in case I'm feeling some fussy-cutting is called for.

And that's it--this "go kit" is always at the ready and has been everywhere with me including the waiting room of our local hospital, California, India, France, the Caribbean, Las Vegas, and even back to Ohio (not only the Heart of it All, but also the state in which I was born).  

No matter where I go I can count on that calm, Zen feeling as I color away my troubles.  

Do you have a coloring go kit?  I'd love to see a picture!

Thanks for stopping by,

Essie

Wednesday, January 11, 2023

Blooming Wildly: The Rabbit Hole Designs (and giveaway info)

 Hello Crafty Friends!

I'm back with another lovely new stamp set from The Rabbit Hole Designs - Bloomin Heart.  This set is totally up my alley, and if you love florals even half as much as I do, it might be a "must add" to your collection, too.  It's perfect for Valentines Day, of course, but also great for a heartfelt thank you or friendship card.


I've colored these flowers using Copics accented by colored pencils--and the design is stamped on pages from a French paperback book in my stash.  I love using unusual materials, and so I'm slowly accumulating inexpensive books and magazines in foreign languages for my stash.  I fussy cut the image (although there is a match die set!) and popped it up with foam on top of craft paper I embossed using the Amanda Hot Foil Coverplate.  I mounted that craft background on the brand new layering die set called You've Been Framed -- the largestof those dies is A2 sized.  I added the sentiment as a banner -- and that's it.  Another easy card with what I'd call a "sweetly elegant" vibe. 

But wait--there are GIVEAWAYS: To celebrate the February 2023 release, The Rabbit Hole Designs is giving away two savings vouchers; one to a lucky Instagram follower and one to a lucky Facebook Fan Page follower. The winner will be chosen at random from the comments left on the Instagram post, and tagging friends, and also from commenting on the Fan Page post. So make sure to head on over to Instagram and the Fanpage, look for the giveaway post. @therabbitholedesignsllc and look for the post at The Rabbit Hole Designs Fan Page by 11:59 p.m. PST 01-12-2023 Winners will be contacted via DM for the Instagram winner and announced in the Facebook Fan Page for the Fan Page follower winner on 1-13-2023.

Thanks for stopping by!

Essie


Monday, January 9, 2023

Love Puffin--New from The Rabbit Hole Designs

     Hello Crafty Friends!  It's hard to believe that the crafty happy place that is The Rabbit Hole Designs is turning four!  Owner MaryAnn has a whole lot of crafty inspiration and new products to kick off the week, and I'm excited to share my project using the Rabbit Hole Designs' Love Puffin.  My puffin was "born" (okay, colored) in the Caribbean--I did some art therapy during our family holiday cruise--it was hard to imagine being cold while basking in the sun on our cabin's veranda, but I sketched a little ice floe for him to stand on, just the same. 


You might also notice the cool pierced border for this card--it's new, too, and part of the A2-sized set called You've Been Framed.    It's a great addition to my collection -- so unique, but not in a way that detracts from the main image.  And there's a sunburst die in the set, too--so cool!

And as for the coloring:  I used colored pencils--I find that, for me, these are the easiest things to take along, and applying many layers of penciled on pigment is a really great way to unwind.   These are mostly Prismacolor, but I also use Polychromos and, as long as they're good and sharp, I am happy with both brands. 

To celebrate the February 2023 release, The Rabbit Hole Designs is giving away two savings vouchers; one to a lucky Instagram follower and one to a lucky Facebook Fan Page follower. The winner will be chosen at random from the comments left on the Instagram post, and tagging friends, and also from commenting on the Fan Page post. So make sure to head on over to Instagram and the  Facebook Fanpage, look for the giveaway post. @therabbitholedesignsllc and look for the post at The Rabbit Hole Designs Fan Page by 11:59 p.m. PST 01-12-2023 Winners will be contacted via DM for the Instagram winner and announced in the Facebook Fan Page for the Fan Page follower winner on 1-13-2023 

Thanks for stopping by!

Essie 


Cappucino Dreaming with Hero Arts

Hello friends!  I'm excited to help Hero Arts introduce its January 2023 release, which is all about love --and it includes some great new digital products!  I love digital designs: They're versatile, inexpensive, easy to work with, and take up ZERO storage space in my overstuffed craft room.  


 My card uses images from both the Love Letter digital kit and the Valentine Mugs Printable

These are the contact sheets for each set -- each image is a stand alone and can be resized, colored, flipped and altered to suit your needs.  I'm NOT a digital wizard and use no special software to make these cards--in fact, I use free Google software that I access with my gmail address. 


How I made my card:  I printed the Italian script heart in black onto lightweight card stock using my laser jet printer and cut the page down to 4.75X6.75 inches and ran it through my Minc machine with gold toner foil.   You can skip the foil if you don't have a Minc or a laminator, but if you do. . . . Foil All The Things!

Next I inserted the "you fill my cup" sentiment into the whipped cream topped mug, and printed and foiled it and, after coloring it with my Copics, fussy cut it and put some foam pieces on the back to add dimension to my project.

I made a copy paper reverse mask to fit the large heart image and used Cotton Candy core ink to ink blend that big Italian heart.  Going a little too heavy-handed with my blending in one spot helped create dimension since I had to make some other deeper-colored sections of the heart. I love these happy accidents! 

I positioned the popped up mug at the bottom of that big heart, and plopped the whole panel onto a light gray (Hero Arts Granite) 5X7 (A7) card base.  And that's the card.  I'm calling it "Cappuccino Dreaming."


I'll be back later this month with some more Hero Arts cards using their new digital images. 

Until then, Happy Creating--I can't wait to see what you make!

Essie


Spring Flowers with Hero Arts Digitals