Tuesday, September 27, 2022

The Rabbit Hole Designs: Bunny Books and More Sassy Fun

 Good morning friends!  

I'm delighted to share two more cards highlighting this month's new release from The Rabbit Hold Designs. 

My first card features a sweet set called "Book Lover" and, in addition to what you see here, has a handful of additional book-related sentiments that I love just on their own.  My card is super simple:  Just copic coloring with sparkly gel pen highlights and a hand-drawn wooden floor.  Too easy!


For a second card I used Sassy Sentiments #2 again for a little Alice in Wonderland Get Well card.  The background is hand-marbled paper (have you seen my YT video with my how-to?), and Alice is from the Wonderland stamp set.  


...And there you have it!  Two more cards on Day 2 of release week--I hope you'll visit my DT cohorts and the Rabbit Hole Design's blog for more inspiration and to comment for a chance to win a prize!

Thanks for stopping by!


Essie

Monday, September 26, 2022

Center Stage At The Rabbit Hole Designs

 Hello Crafty Friends!

Today I'm excited to join The Rabbit Hold Designs family of designers to help usher in our newest release.  


The new Bunny Ballet set is full of joy and sweetness--and as a bonus, it's easy and fun to color!  For today's card, I've paired the solo ballerina with TRHD's new Triangle Mosaic stencil which I've used to create a stage and spotlight for my bunny.  The sentiment is one of my favorites from the fabulous Alice in Wonderland release, part of the Heard in Wonderland set.  


My second card today also features the Triangle Mosaic stencil and the new Sassy Sentiments #2 set, as well as the Script Happy small but oh-so useful set. Result--another flat panel colorful but super fun card ready for one of my snarky besties!

There's so much to see this week from The Rabbit Hole Designs.  I hope you'll hop along with us on our blogs and see our creations all over social media! And yes, there's even a GIVEAWAY:

To celebrate the October 2022 release, The Rabbit Hole Designs is giving away two savings vouchers; one to a lucky Instagram follower and one to a lucky Fan Page follower. The winner will be chosen at random from the comments left on the INSTAGRAM post, and tagging friends, and also from commenting on the Fan Page post.

So make sure to head on over to INSTAGRAM and look for the giveaway post @therabbitholedesignsllc you can also look for the post at. The Rabbit Hole Designs Fan Page.

Comment by by 11:59 p.m. PST 09-29-2022--Winners will be contacted via DM for the IG winner and announced in the Facebook Fanpage group on 09-30-2022.

I hope you'll have time to visit my teammates!

DAY 1           
The Rabbit Hole Designs
Lauren

Jenn

Amy

Tracy S.

Leah

Dalis

Essie

Lydia

Deana


Thanks for stopping by!

Essie


Monday, August 15, 2022

Power Poppy Challenge: Feeling Sentimental

 Hello Crafty Friend,

    Today at Power Poppy, we're all feeling a bit sentimental as summer draws to a close, and fall and new school adventures beckon.  Our challenge this month is to make your Power Poppy sentiment the focal point of your card and build the other elements around that sentiment.

    My sentiment comes from the gorgeous (!!!) Peonies digital stamp set.  Using the Heart Abloom digital stamp set, I pasted the single anemone  images six times and rotated and flipped it, making a top and bottom border around the sentiment.  

Since I have a new computer and Microsoft Word is not yet installed), I built this design as a Google slide, which is something I've never done before. And yes, I used the free-ware version, because I prefer to save my crafty $$ for stamps, digital images, and every coloring medium I can get my mitts on!  It was ridiculously intuitive!  Here's the image I madethat took only 10 minutes:


The rest is equally easy:

1. Using a Laser Jet printer, print your image onto card stock.

2. Color the peonies using alcohol markers (I use Copics). 

3. Using a light blue (B000) Copic, make drop shawdows for the flowers AND the sentiment.

4. Cut out the A2 panel and trim 1/8 inch from the left and right sides (= 4 X 5 1/2).

5. Foil the entire panel.  I use a Heidi Swapp Minc machine and Thermoweb gold deco foil.

6. Mount on a peony pink, top-folding A2 card. 

7. Add a few pinkish gems for a little bit of bling.  

And...voila!


    Foiled cards are tricky to photograph, but let me just say that in real life (IRL, as my teen would write) it is just "wow."

    I hope you'll join our challenge, which runs through September 15--Marcella has great sentimental digis on sale to inspire you to try something new, and we'll have a $20 gift certificate for a lucky winner--just upload your Power Poppy "sentimental" project to the blog to play along!

Happy crafting!
Essie


Monday, June 20, 2022

Glassy-Eyed: Month-Long Challenge with Power Poppy

 Hello Crafty Friends!

Today we begin a new month-long challenge at Power Poppy -- and it's all about incorporating glass and shine into your Power Poppy creation. There are so many designs that work well with this challenge -- and sweet Marcella Hawley is discounting most of them in the Power Poppy shop, so it's a perfect time to work on your glassy coloring technique!

My card for this challenge uses the digi stamp called Seaside Sweetness--I love that summer, beachy vibe!

I've colored the beachy image under a glass cloche very simply, and am using the very lightest of my B and BG Copic markers to create the appearance of glass covering the seaside vignette with its enamel teapot, coral, starfish, shell, and sand.  One of my great delights in using digital stamps is that I can scale the design to suit my card--and this is a pretty big (A7:  5X7 inch) card, so I scaled the design to 115%.  


After fussy cutting the cloche, I used a black Sharpie to color its edges--simple addition, but one that really makes the image pop.  To keep the glass effect going, the background behind the cloche is ink-blended in the same color family as the glass (I used Tim Holtz' Tumbled Glass distress ink) and the image is popped up on foam strips.  I also made a picnic table with a tablecloth created using Hero Arts Bandana Bold Print background stamp and a couple of shades of red ink to give that cloth some movement.  The table top is a woodgrain stencil from my stash ... and the sentiment--also Power Poppy--keeps my glassy theme on point.  

I hope you'll try your hand some of Power Poppy's glassy designs--such an easy way to give some extra interest and dimension to your images.  

Can't wait to see what you make!

Essie 

Monday, May 16, 2022

Blossoms, Dearie--Power Poppy's Blossom Challenge!

 Hello Crafty Friends,

Happy Spring -- my garden is blooming, and I'm beyond delighted to join the wonderfully talented Bloom Brigade at Power Poppy as we welcome the season with blossoms, blooms, and florals galore!  

We have a new monthly challenge this month--a Blossom Challenge!  All you need to do is link your Power Poppy floral creation to the Power Poppy blog for a chance to win.  

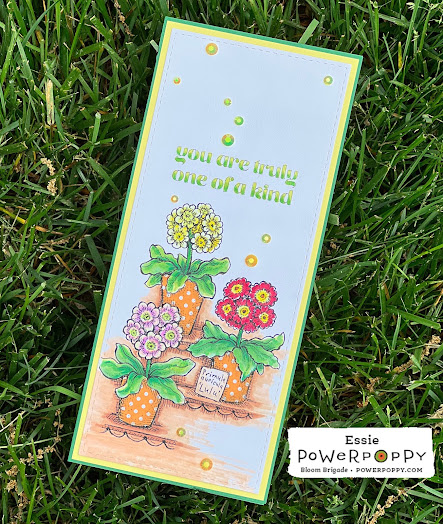
My slimline card today uses the digital stamp Auricula Theatre and its open font sentiment.  

Digital stamps are super versatile!  One of their great benefits is that you can size them to meet your preferred card size--and this one is a big, bold 4X9 inches. 


To me, these simple primroses in simple pots and some easy Copic coloring herald the start of garden season. If you look closely at the pots, you may notice the perfectly symmetrical polka dots--I printed the dig image on orange polka dot paper from my stash, paper-pieced in the pots, and game them a little warm gray shading.  Added some yellow gems from my stash and...boom.  Done and ready to mail.  

I hope you'll join our challenge!

Happy creating!

Essie


A Big Bright Celebration with Hero Arts