Monday, May 6, 2024

A Big Bright Celebration with Hero Arts

This month's Hero Arts release is all about birthdays--and the Digital Kit add-on is birthday ready, too!

The Birthday Blow Up Digital is full of images ready for a birthday party.  There are balloons for days, a lovely Happy Birthday and this bold CELEBRATE image, that I used to make this quick, bright card.


I printed the CELEBRATE design (it has a kind of 1960s vibe, I think) onto lightweight cardstock using my LaserJet and colored in the CELEBRATE letters using my copics (RV02, B01, and Y13). These three primary colors make a rainbow where yellow and pink create orange, and yellow and blue make green.  I colored in the open stars and rectangles and that was it for coloring (took less than five minutes).  I foiled my card front using heat-activated foil, matted the image with silver cardstock, plonked it onto a white A2 card base and that was that--ready for the party!

Thanks for dropping by!

Essie


Monday, April 1, 2024

Spring Flowers with Hero Arts Digitals

 I'm excited to joing the April Hero Arts new release blog hop--so many lovely new designs! While I'm waiting for my new My Monthly Hero kit and add-ons (can't resist!), I've used one of the two new digital art kits to make a quick set of note cards--perfect to give as a little gift!


This is a super simple card set--thanks to the Spring Flower Panels Printable.  And this printable is beyond easy to use--it is literally two different single page printable panels, each providing 4 A2-sized panels in bright spring colors.  To use it, just download the printable to your computer and print it on any color printer.  Here's my printout--on plain old copy paper, because I was too impatient to load my printer with cardstock!

I used a double-sided adhesive sheet to affix the printout to lightweight cardstock and cut each panel out using my Hero Arts Infinity Rectangle Dies. I matted each panel with Hero Arts Pitch Black card stock (I hoard this stuff), and then quickly built these two cards using the Smile Friend Stamp & Cut XL set.


I made these two using the Butterfly Foliage Fancy Dies.  


I used white cardstock triple-stacked for all the die cuts.  I added the black-matted panels to A2 card bases, and that was that.  

If you came here through the Hero Arts' blog hop, congrats on making it all the way to the end!  Please leave me a comment!  Hero Arts will give away a $50 gift card, drawn from the comments left across the hop. Enter by Sunday, April 7th at 11:59pm Pacific, and the winner will be announced on the Hero Arts blog the following week.

Thanks for stopping by!
Essie


Monday, February 5, 2024

A Big Hello with Hero Arts

 Hi Crafty Friends,

Well, as I endure my third case of COVID (yes, third), I decided that an easy all occasion hello card was what I needed for my stash.  And thanks to latest Hero Arts Digital kit, called Mix & Match, I found a cool graphic that I quickly turned into a rainbow of "hellos" background and topped it with (what else?) a great big HELLO -- this time using the alphabet die that was part of the incredible My Monthly Hero December 2023 kit (and yes, that fabulous kit is still available).  

And honestly, that's my card--ready for almost any occasion (get well, happy birthday, miss you):


I hope you've had a chance to enjoy the rest of the hop, which celebrates the February release and brings us all tons of inspiration (while we wait for our February kits to come to our homes).  Here's the whole list so that you don't miss a single creation!

Thanks for dropping by!
Essie


Monday, January 8, 2024

Elegant Valentines with Hero Arts Digital Designs

 Hello Crafty Friends,

I had a bit of a lightbulb moment recently:  My children are no longer little kids.  My son (20) and daughter (17) still (claim to!) love to get cards from me--but cutesie critters from my stash are no longer great choices for either of them.  Time to change up my card-making for the kids. 

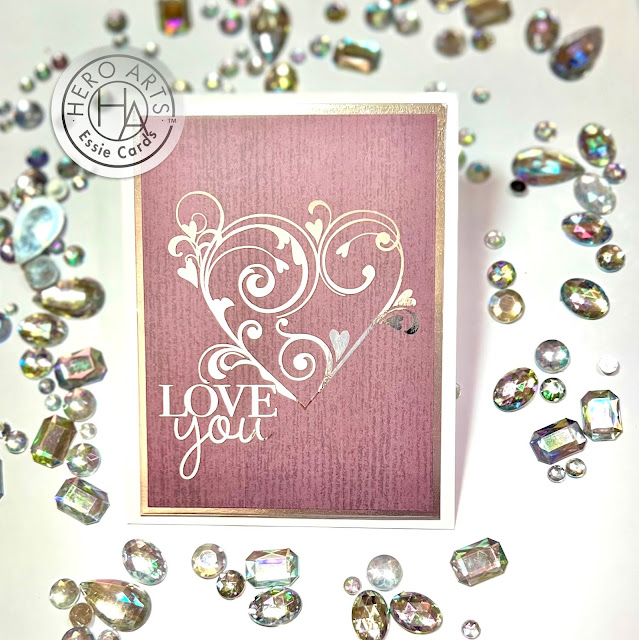
Fortunately,  the Swirl Valentine Digital Kit from Hero Arts is just what I need to create elegant cards for both of them.  

Here's the card for my son:

How to:  Using the burgundy background in the kit, the swirly big heart, and the Love You sentiment, I quickly built a card for my son--I printed the background on our family color printer and then over printed the heart and sentiment over the background using my laser jet printer.  I added silver toner foil to the design, ran it through my Minc foiling machine matted it with silver cardstock, and put it on an A2 card base.  Too. Easy!

Here's my daughter's card:

How to:  I created a background using the Leaf and Floral Stencil and pink inks.  I printed the same image and sentiment I used for my son's card--but this time I printed it onto vellum paper using my laser jet.  I added hot pink toner foil to the vellum, and ran it through my Minc.  I also blended pink inks onto the back of the heart image to help it stand out.  I placed the vellum design on the background and that was it!

Two elegant cards for my nearly adult kids (wow, time flies), ready in plenty of time for Valentine's Day. 

My post is part of the February Hero Arts blog hop -- and if you leave comments here and on other stops along the hop, you could win $50 gift card, drawn from the comments left across the hop. Enter by Sunday, January 14th at 11:59pm PT, and the winner will be announced on the Hero Arts blog the following week.

Here's the entire hop list:

Thanks for stopping by!

Essie

A Big Bright Celebration with Hero Arts